Sunday, December 18, 2011

The Winner of the Knook Giveaway is...


#1 ~ Lori M. said...

Congratulations on hitting 1000 fans...already a fan! I would love to re-learn to knit...been thinking about trying out the Knook!

WOW! The first comment won! When does that happen!?

Lori please email me ASAP with your mailing address at mail.oodles4noodles@gmail.com.
After 24hours I will chose a new winner if I don't hear from you.

Hope you enjoy the Knook!

Saturday, December 17, 2011

Knook Giveaway! Act Quick! 36 Hour Giveaway!

Hi  everyone! I just notices that Oodles 4 Noodles has hit 1,001 Facebook fans! Woo Hoo! Thanks for sticking with me, even though I have been pretty absent the last few weeks. I promise that will change after the Holidays! To help celebrate, I thought I would giveaway my slightly used Knook! Click the picture for more info about The Knook.


To Enter:
1. Like the Oodles 4 Noodles Facebook Page HERE  ~ (I will be checking to see if the winner is a fan)

2. Make a comment on this post as to why you want to win the Knook.

For a second entry you can...

3. Share this giveaway on Facebook, through email or your blog and let me know you did in a separate comment.

I will draw the winner randomly.  I will draw and post the winner Sunday, Dec 18th at 9pm MST. I will post the winner on this blog! Then you must contact me within 24 hours to receive the Knook!

OK? GO!


Sunday, November 20, 2011

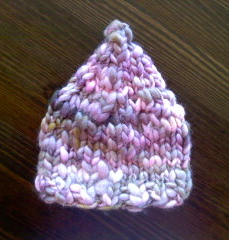
Baby Pixie Hat 0-3 Months - My First Knitting Pattern!!


Here is my first knitting pattern ever.  Hope you like it! I just made it up as I went, but am pretty happy with the may it turned out. If I were to make this hat again, I would start with 24 sts and omit row 13.  I think that would make it more of a newborn size. Here is the video I followed to learn how to use Double Pointed Needles.  This video was made by the fiber artist from whom I purchased the yarn in the photo.


So here is the pattern! Enjoy! Please share pictures if you make this! :-)

This pattern can also be downloaded from Ravelry Here, Crafsy Here,


If you'd like to say "Thanks" for the free patterns and support future patterns, pleaseconsider sending a small gift through PayPal to me at cclpiper@gmail.com :)


Tuesday, November 1, 2011

Teeny Beanie Christmas Ornament ~ Free Pattern


Today is the first day of November! For us, that means we start getting seriously into Christmas! So to celebrate, I am posting a pattern for a teeny beanie to use as an ornament. Just put a wire hook in the top, make a few into a mantle garland, or use it as a wine bottle topper! If you make a one or a few I'd love to see what creative uses you come up with. Post a link to pictures in the comments or on the Oddles4Noodles Facebook Fan Page.  Can't wait to see what you come up with!!
Downloaded from Ravelry Here,  Craftsy Here, Direct Download Here.

If you'd like to say "Thanks" for the free patterns and support future patterns, please consider sending a small gift through PayPal to me at cclpiper@gmail.com :)

Friday, October 21, 2011

3 Strand Chain Stitch Headband & Flower - Video Tutorial

I made this video for the ladies & girls in our Homemaking Co-op.  If a bunch of 9-13 year old girls who have never crocheted before can make this headband, you can too! Have fun!!


Part One


Part Two

Monday, September 26, 2011

Basic Chunky Newborn Beanie Video Tutorial

I made a tutorial video for the Basic Chunky Newborn Beanie.  You can get the written pattern in this post
http://oodles4noodles.blogspot.com/2011/06/basic-chunky-newborn-beanie-free.html

Below is a step by step video tutorial in 2 parts. I tried to make it detailed enough so someone who had never crocheted before can make the hat.  Hope you make a few for the Beanie Drive!

Saturday, September 24, 2011

Crabby Cardinal Hat


Here is a pattern for an Angry Bird inspired hat. One without eyes, so it's more of a costume hat. ENJOY!!  Download on Ravelry Here and Craftsy Here.


Thursday, September 15, 2011

Fall Baby Beanie Drive

Hey Everyone! It's time for a Fall Baby Beanie Drive. I have selected Pregnancy Resource Center of Salt Lake City, as our recipient. My goal is to collect 200 crocheted & knitted hats for Newborns & Preemies by October 24th! Can we do it? Now I can't make these all myself. Are you willing to make a few and send them to me? If you are please email me at mail.oodles4noodles@gmail.com so I can send you my mailing address. You can find a few free patterns on my blog and many other places on the web. If you live in the area you can deliver them with me! I will keep you all updated on donations with pic's. It's getting cooler here in Utah, so let's keep those little heads warm! Please share this around FB as much as possible. Thanks!!
Here is there link for more info on the organization!
http://www.pregnancyresource.net/

Here's a link to my Basic Chunky Newborn Beanie. http://oodles4noodles.blogspot.com/2011/06/basic-chunky-newborn-beanie-free.html
to get you started.

Wednesday, September 7, 2011

Speckled Frog Giveaway Winner

There were 38 entries. The winning entry is Entry Number 8!

 Who said....

Jamie said... I love the lamb hat from speckled frog and the crown and tiara from oodles.

I and Speckled Frog Crochet will be contacting you at the email you provided!  Congratulations!

Thursday, September 1, 2011

Giveaway with Speckled Frog Crochet


I love, love Speckled Frog Crochet Patterns! Cyprianne is who I want to be when I grow up! :-) I feel very honored to be chosen to participate in this giveaway!
Here are the prizes: A pattern of your choice form her Etsy Pattern Shop & a pattern of your choice from my Etsy Pattern Shop. One winner gets both!
Here is how to enter:
  1. Go to Speckled Frog Crochet Facebook Page and "Like" the page
  2. Go to Oodles 4 Noodles Facebook Page and "Like" the page
  3. Visit Speckled Frog Crochet Etsy Shop and check out her patterns
  4. Visit Oodles 4 Noodles Etsy Shop and check out my patterns
  5. Comment on this Blog Post (not on the  Facebook Pages) with the patterns you like most.
You may enter until Noon (MST) on Sept. 7. I will draw for the winner Sept 7th in the evening. The winner will be announce in the comments of this post and on both Facebook Pages. It will be verified that the winner "Likes" both Facebook Pages.  Please share and have fun!!!

Tuesday, August 23, 2011

Candy Corn Bow ~ Free Pattern!!!

 I have noticed the first Aspens starting to turn gold. It's hard to believe summer is almost over! Here is a pattern to help usher in Autumn.  Based on one of my favorite Halloween candies! Enjoy!
Download on Ravelry for free at this Link


Thursday, August 18, 2011

Crocheting Hats for Preemies – Tutorial & Pattern


Making hats for preemies not difficult and it is a quick project for charity or hospital donations.

PREEMIE HAT SIZES
First we need to discuss sizing. Preemies come in all sizes. Below is a chart I developed based on head circumference.

Baby’s
Weight
Head Circumference
Hat Circumference
Hat Height- edge to crown
Hat Crown Diameter
1-2 lbs.
9”-10”
8”
3”
2.5”
2-3 lbs.
10”-11”
9”
3.25”
2.8”
4-5 lbs.
11”-12”
10”
3.5”
3.2”
5-6 lbs.
12-13”
11”
4”
4”

Crochet hats have 1” – 1 ½ “ stretch. That is why the hat circumference is smaller than the head circumference. Hat height is measured before brim. If you want to add a rolled up brim continue for ½ “ to 1” longer. 

So now that we have some approximate measurements for preemie hats. Here is how to design your own hats.  Following this method you may use any yarn, hook and stitch combination to get the size you want.  Here is how.

IMPORTANCE OF CROWN DIAMETER


The Hat Crown Diameter is the key to achieving the right hat circumference.  To understand this, we need to go back to geometry.  And you said you would never need to use that stuff! :-)

To figure out how large to make the hat crown you take the desired hat circumference and divide it by 3.14 (remember your good friend π). For those of you who are mathematically minded it looks like this.

Crown Diameter = Desired Circumference / 3.14


HOW TO INCREASE THE CROWN

You simply increase evenly until you reach the desired crown diameter, then stop increasing and continue to add rows until desired hat length from crown to bottom edge.  If this is Greek to you here is how to increase evenly and shape your hat crown.

Your first step is to decide on what stitch you want to use and the number of sts to start with. Usually when I am crocheting in the round I start with 6-8 if using sc, 8-10 if using hdc and 10-12 if using dc.  Now to increase evenly you will increase each round by the same number of stitches you started with in the first round.  Here is the general pattern

R1: Start with your beginning number of sts in a magic loop – join with sl st (every round)
R2: ch up as many as you need to for your sts (every round), 2 sts in each st
R3: 1 st in first st, 2 sts in the next st (this is the “increase”)– repeat around to end
R4: 1 st in the first 2 sts, 2 sts in the next st– repeat around to end
R5: 1 st in the first 3 sts, 2 sts in the next st - repeat around to end
R6: 1 st in the first 4 sts, 2 sts in the next st - repeat around to end

Continue rounds in this pattern, adding one more st between each increase with each round, until you reach the desired Crown Diameter.  Then continue in each round crocheting one st into each previous st until you reach the desired height from edge to crown.

You may need to play around with sts and hook size to get the Crown Diameter you want.

Below is a pattern to get you started.

PATTERN FOR BASIC PREEMIE HAT 


 This hat should have a circumference of about 11” and height of 4”

Supplies:
Chunky Weight Yarn Level 5
Size L Hook

  *Join each round with a slip st in first st*
   
R1: Magic Loop, Ch. 1, 8 hdc
R2: Ch1, 2 hdc in each st
R3: Ch1, *1 hcd in the first st, 2 hdc in the next st* repeat * to * until end
R4 -7: Ch1, hdc in each st around.
R8: Ch1, crab stitch around for edge. Join with invisible join. OR you could sc around or use any edge st you like.

Here is another website that has some more pattern to get you started. 
Have fun making hats for the littlest littles!!

You may download this tutorial in PDF Form Here or Here

***** You may do anything you like with items you make using my patterns.  If you sell them on-line I only ask that you link back to the post. You may also link back to this post on any blog or website. Please do not copy any part of this pattern and claim it as your own or copy and re-post it elsewhere. Thank You ***** 


Friday, July 29, 2011

No Sew Ruffle Rose & Ribbed Headband


I used worsted weight yarn and an H (5mm) Hook for both the headband and rose.


First the headband -
This is super easy. Ch to the width you want your headband to be plus 2.  In the picture I chained 8 because I wanted the headband to be 6 stitches across. It can be any width.

** I never count the chain up at the beginning of a row as a stitch and I crochet into each st across. Even the first one that the chain up is connected to. This is an assumption in the pattern.***

R1: Hdc in the 3rd chain from hook and in each chain across. Turn

R2: Ch2, hdc in the back loop of each stitch until the last stitch, hdc in both loops of the last stitch.

Repeat R2 until your desired length. It's best to measure the head of the person who will wear this, but here is a general guide. 
Newborn = 13"
0-6 Months = 15"
6-12 Months = 17''
Toddler =  19"
Preschooler = 20 -21"
Child = 21-22"
Teen to Adult = 22-23" or more
I have a big head and it measures about 25" (It's true, I do. When I was born I was only 6 pounds but when people saw me wrapped up they all thought I was huge - like 10 lbs. from the size of my head. Like you needed to know that about me! ;-)

Once you reach your desired length fold the headband matching up the 2 short sides. Both sides of the headband are the same so there is no right or wrong side to worry about. Now you can either slip stitch these 2 ends together or cut a long tail, get out your tapestry needle and whip stitch them together. Tie off and weave in the yarn ends and the headband is done. You will be sewing the flower over the seam.


Now for the Flower. 
Most roses have you crochet a long scalloped strip, roll it up and sew it together. This one is different. It's not scalloped or sewn. I got the idea from making fabric roses out of gathered material strips.

Join each round with a sl st in first st as indicated.
R1: Magic Loop. Ch 1, 6sc in magic loop, pull loop tight
R2: Ch1, 2 sc in front loop of each st around, join in front loop
R3: Ch1, * sc in front loop of the first st, 2 sc in the front loop of the next *, repeat * to * around, join in front loop
You have made a circle that will be the base to the rose. Turn your circle over. You will see a spiral made up of the back loops of each st and the joining slip stitches. I will now refer to each loop in the spiral as a loop. 
Working in these loops - ch 2, crochet 3 dc in each loop, following the spiral all the way around to the last loop. In the last loop work - dc, hdc, sc.  Tie off with a long tail for sewing. Sew the tail through the center of the flower. This will make the ruffle curve nicely into the center. Sew on the headband over the headband seam.
Crocheting into the spiral of loops can get tricking. I find it helpful to fold the base of the flower at the loop you are trying to work into. 
Enjoy this pattern. Please email me if you have any questions! mail.oodles4noodles@gmail.com

***** You may do anything you like with items you make using my patterns.  If you sell them on-line I only ask that you link back to the post. You may also link back to this post on any blog or website. Please do not copy any part of this pattern and claim it as your own or copy and re-post it elsewhere. Thank You ***** 

Monday, July 18, 2011

Facebook Giveaway!!!

Hi All! I know I have been absent lately. I have been out of town and dealing with many family issues. I am back for a few weeks before I move to Hawaii on Sept. 1st.  Here is a link to my Facebook Page HERE   

Here are the details!
THE PROMISED GIVEAWAY! Help me get to 200 fans. Winner will win their choice of 2 patterns or one handmade item from my Etsy Shop. To Enter - comment on this post or the fan page wall. Get you friends to like the fan page & mention your name in the post (that's another entry for you & one for your friend). This will giveaway end when I reach 200. 1-2-3 GO!!!
 

Wednesday, June 15, 2011

Newborn Crown or Tiara

This is a simple crown pattern. I think it would be a great prop for newborn photos.
Download on Ravelry Here & Craftsy Here.

Friday, June 3, 2011

I'm a Designer on All Free Crochet!!!

Check me out! I am a designer on All Free Crochet!  You can check out my Designer Bio here.  This site is a great free resource for patterns & tutorials! This has really inspired my to get more free patterns on my blog. My next free pattern will be Newborn size of the crown pictured below. What an adorable prop this would be for a newborn photo session!

Thursday, June 2, 2011

Basic Chunky Newborn Beanie ~ Free Pattern

This is a very basic beanie pattern. It is super cute on newborns! Great for baby's first pictures, a quick handmade gift or charitable giving. This hat will measure about 13" in circumference and about 5" (little less) crown to brim.

 UPDATE!!!!!
 You can see a 2 part video tutorial for this hat at this link ~ http://oodles4noodles.blogspot.com/2011/09/basic-chunky-newborn-beanie-video.html


Materials:  Bulky Weight - Level 5 or 6 yarn (I used Impeccable Charisma from Micheals)
                Size L crochet hook
                Yarn Needle

* At the end of each round join with a slip st in the first st *

Rnd 1: Magic Loop, ch.2, 12 dc, pull loop tight
Rnd 2: Ch 2, dc in same space, * 2 dc in next st, 1 dc in next st * repeat * to * until end of round (18 dc)
Rnd 3: Repeat Rnd 2 (27 dc)
Rnd 4 - 7: Ch 2, dc in each st around (27 dc)

At the end of Rnd 7 join with Invisible Join.

Super easy, super fast & super cute hat!! Embelish with crochet flower or nice big button! If you make this please leave me a link with pictures or post them to my Facebook page. Link is to the right.
Enjoy!!

***** You may do anything you like with items you make using my patterns.  If you sell them on-line I only ask that you link back to the post. You may also link back to this post on any blog or website. Please do not copy any part of this pattern and claim it as your own or copy and re-post it elsewhere. Thank You *****

Tuesday, May 31, 2011

Video Tutorial - Invisible Join

There is nothing worse than finishing an adorable baby hat and tieing it off with a knot. It's ugly and ruins the look of the hat. I made a video tutorial showing how to join the last round of your hat (or anything else really) with an invisible join. Hope you enjoy it and learn something useful!

Tuesday, May 17, 2011

Magic Loop Video

Hi Everyone!
This Tuesdays Tutorial is a video on crocheting into a magic loop! Some call it a magic circle or adjustable loop. I start all my hats this way! So here it is.


Hope you enjoy it. I'd love feedback on this videos.  Are there other topics, techniques that you'd like to see in video form for Tutorial Tuesdays?

Tuesday, April 19, 2011

Spring Chick Applique Pattern

Aren't the little chicks cute! Here is how you can make one!


So Cute on a Little Hat!!!


You can use any yarn with appropriate size hook for this.  The yarn type & hook size will determine the finished size of the chick. The yellow one is made with worsted weight yarn & a 5mm hook. The finished size is 2.75 inches beak to tail & 2.5 inches top to bottom.

Here is the basic technique.
ch = chain
sl st = slip stitch
sc = single crochet
dc = double crochet
hdc = half double crochet
trc = triple crochet
quadc = quadruple crochet, yo 3 times, insert hook into st, pull up loop, yo pull through 2 loop 4 times
pentc = penta crochet, yo 4 times, insert hook into st, pull up loop, yo pull through 2 loops 5 times

Sorry for the weird names of quadc & pentc, but I don't know the names of these stitches, so I called them what made sense to me. Does anyone know their official name? Couldn't find it on google.

R1 - 10 sc in a magic loop. If you don't know how to crochet in a magic loop you can watch a video here.  Tighten your magic loop but do not join with a slip stitch as you may be accustomed to doing. Instead just make the first stitch on the second round in the first sc of the first round.

R2 - 2sc in the first st (you may want to mark the first sc with a stitch marker), sc in 2nd, hdc then dc in 3rd, 2dc in 4th and 5th, 2sc in 6th, sc then dc in 7th,  2 trc in 8th, 2 quadc in 9th,  2 quadc in 10th. Again do not join.

R3 - Now your next stitch should be the first sc of the second round. In this stitch do 2 quadc & 1 pentac. Ch1, sl st in the same space (this will give a tiny point to the tail feathers). Now sl st down the side of the pentc going right to left. Join when you meet up with the next stitch.  It will look like this.


Now you should see the shape of the chick, but the tail part has such long stitches that it doesn't hold together.  So, tie off leaving a long tail to sew with. Flip the chick over and sew up and down the backs of all those stitches.  You will see little loops going up the back of each stitch.
Sew up and down under these little loops in rows to secure your stitches together.


For the eye sew a french knot between the 7th & 8th stitch of the second round. I first sewed a small straight stitch between the two catching a few threads from each and then sewed the french knot into the straight stitch to give it something to hold on to.

For the beak - join beak yarn in the 10th stitch of the second row. sc in the same stitch. fasten off and weave ends.

Hope you enjoy making these chickies! If you do please let me know! I'd love to see pic's! If you have any questions please don't hesitate to ask in comments or email me at mail.oodles4noodles@gmail.com

 © 2011 Carrie A. Piper
****You may do anything you like with items you make using my patterns.  If you sell them on-line I only ask that you link back to the post. You may also link back to this post on any blog or website. Please do not copy any part of this pattern and claim it as your own or copy and re-post it elsewhere. Thank You ****

Wednesday, March 23, 2011

Long Tailed Baby Elf Hat - Tutorial & Pattern


Thanks for this pic Room 118!
http://www.room118photography.com/


Materials - A size I crochet hook, 1 skein of each color. I used Lion Brand Nature's Choice Organic Cotton in strawberry & almond. This yarn is marked as level 4 worsted weight. It had a bumpy texture and seemed closer to a level 5 in bulkiness to me.

YOU MAY DOWNLOAD A PDF OF THIS PATTERN ON Craftsy or Ravelry

This hat is 37 inches from end of tail to bottom of the ribbed brim and about 12 inches in circumference.

Directions are given for making the hat larger.

Wednesday, March 2, 2011

Luck O' The Irish - Shamrock Tutorial

My Etsy shop is up & so is my Facebook Fan Page. What better way to get things started than with a tutorial on how to crochet a shamrock & 4-leaf clover. So in honor of St. Patrick, March & my Irish ancestors - here it goes!
L- 4-Leaf Clover in Worsted Weight,   R- Shamrock with Bulky yarn

Materials - Any weight yarn with hook to match it's weight. You will need a very small amount of yarn.

To start you have 2 options - work in a magic ring or chain 3 and join with a slip stitch.

For Leaves - work the following into the center of the magic or chain ring you just made - ch3, tr, dc, tr, ch3, sl st - do this 3 times for a shamrock & 4 times for a 4-leaf clover.

Stem - after last sl st chain 5 to 7 (depending on how long you want your stem, I did 5). Sc in second chain from the hook. Sl st in each ch up the stem. fasten off & weave in ends.

Note - if you used a magic ring you should tighten it up before crocheting the stem.

Now you can make it into a pin, a magnet, put it on a hair clip or head band!
Hopefully some Irish luck will rub off on both you & me!

Until next time - Erin Go Bragh!